
Imagine spending weeks designing beautiful packaging, only to find the logo is cut off or the folds don’t line up. That’s where dielines come in. They act as the blueprint that guides printers and manufacturers so your packaging looks and functions exactly as intended.
What is a Dieline?
A dieline is a flat template that shows where a package will be cut, folded, and glued during production. It’s the foundation of packaging design and ensures that your artwork lines up correctly on the final 3D product.
A dieline defines the printed part of a package from the unprinted part. It used in the packaging and printing industries that guarantees that the layout of a physical package design is proper before it is put into production. Usually created by a packaging designer, a dieline is a flat diagram that includes symbols to show the fold and cut lines of a package.
-
Define the boundaries between printed and unprinted areas.
-
Mark cut, fold, trim, and safe zones.
-
Act as a communication tool between designers, printers, and manufacturers.
Without a proper dieline, your packaging could have misaligned graphics, cut-off text, or wasted material.
History & Origin of Dielines
The concept of dielines comes from traditional die-cutting used in print and packaging. The term "die" refers to the sharp metal blade that cuts material into specific shapes, while the “line” shows where these cuts or folds occur. Over time, digital tools like Adobe Illustrator and CorelDRAW made it easier to design dielines virtually before production.
Types of Lines in the Dieline

Trim Line
The trim line is the boundary that shows where your printed design will be cut to its final size. It marks the exact edge of your packaging, label, or printed piece.
This line ensures that the finished product has clean, even edges after cutting. Designers must keep important text, logos, or design elements slightly inside the trim line, so nothing essential gets accidentally cut off during production.
Bleed Line
The bleed line is the outer boundary that extends beyond the trim line. It shows how far the background colors, patterns, or images should stretch past the trim line.
This line ensures there are no white edges or gaps after cutting. Since trimming can shift slightly during production, extending your design to the bleed line guarantees a seamless look, with colors or graphics running cleanly to the edge of the finished product.
Safe Zone Line
The safe zone is the inner boundary inside the trim line where all important content such as text, logos, and key design elements should be placed. Anything outside this area runs the risk of being cut off.
Safe zone acts as a safety margin to protect critical information during trimming. Since slight cutting shifts can happen in production, keeping essential elements inside the safe zone ensures they remain fully visible and centered on the final product.
The Fold Line
The fold line is a guide that shows where the printed material will be folded. It does not represent a cut but a crease that helps shape the packaging or printed piece.
This line ensures accurate folding during production so the design aligns correctly on all panels. Designers must pay attention to this line to keep text, images, or graphics from being distorted or misplaced when the material is folded into its final shape.
Perforation Line
The perforation line is a series of small cuts or holes made on packaging material. It marks areas that are meant to be easily torn, bent, or opened.
This line makes it simple for customers to open a box without damaging the product. Designers use it in tear-off flaps, coupons, or easy-open sections of packaging.
Glue Line
The glue line shows where adhesive will be applied to join parts of the packaging together. It is not a cut or fold, but a guide for assembly.
This line ensures the box stays secure and in proper shape. Designers must avoid placing important artwork or text in this area, as it will be covered with glue.
Window Line
The window line marks the area that will be cut out to create a window on the packaging. A transparent film is often added behind this cut-out.
This line allows customers to see the product inside while keeping it protected. Designers should plan graphics around the window so the product view remains clear and attractive.
How to Make a Dieline
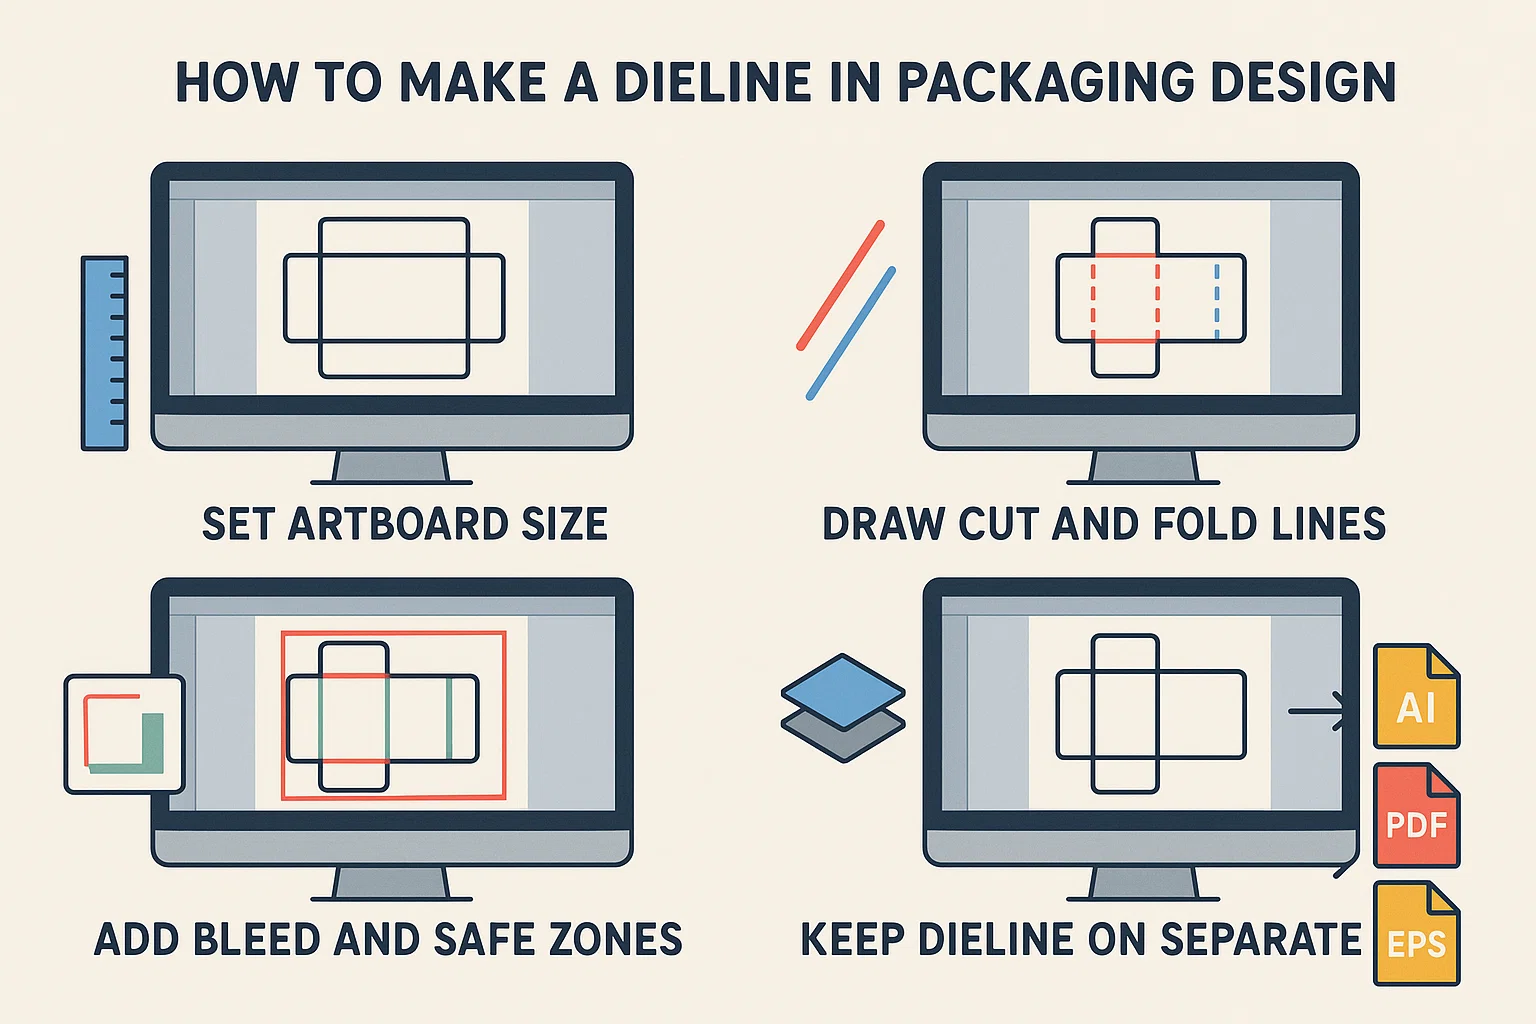
A dieline is the foundation of packaging design. It shows exactly where your box will be cut, folded, and glued. Follow these steps to learn how to make a dieline correctly:
1. Open design software
Start with professional tools like Adobe Illustrator or InDesign. Illustrator is the most widely used software to create dielines because it offers precision and flexibility. If you don’t have these, you can also explore other software to create dielines.
2. Set the artboard size
Match the artboard to the dimensions of your packaging. For example, if your box is 8x6x3 inches, set the same size in your file. This ensures your dieline will fit the final product perfectly.
3. Draw cut and fold lines
Use different colors to mark each line type. For example, solid red for cut lines and dashed blue for fold lines. This makes the dieline easy to read and avoids confusion during printing.
4. Add bleed and safe zones
Extend backgrounds or patterns to the bleed line. Keep important text, logos, or graphics inside the safe zone. This prevents trimming issues, one of the most common mistakes in dielines.
5. Keep dieline on a separate layer
Always place the dieline on a non-printing layer. This allows the printer to see the guide without it appearing on the finished box. Keeping layers organized also helps avoid costly errors.
6. Save and export
Save your work in AI format to edit later, and export as PDF or EPS for the printer. These file types are standard and ensure the dieline prints correctly without losing quality.
What Is a Dieline Used For?
A dieline is a template that shows exactly where a package will be cut, folded, and glued. It acts as a blueprint that connects design with production.
Designers use dielines to position graphics and text correctly on each panel. Printers rely on them to ensure packaging is produced accurately and consistently. Without a dieline, artwork may not align with the final box structure.
Guides Design Placement
A dieline ensures logos, artwork, and text are placed in the right position. This keeps the design balanced and visually appealing on all sides of the packaging.
Indicates Cut and Fold Lines
It clearly marks where the material will be cut, folded, or glued. These instructions help the packaging take its intended shape during production.
Prevents Production Errors
By mapping out the structure in advance, dielines reduce risks like misaligned graphics or important details being trimmed off. This saves both time and cost.
Helps Build 3D Packaging
Dielines allow flat designs to be folded into real, functional packages. They make it easier to test how the design will look in its final form.
Essential for Printing
Printers depend on dielines to understand cutting, folding, and finishing instructions. This ensures smooth communication and consistent results in production.
Why Dielines Are Important in Packaging Design
Stop Mistakes in Printing
A dieline acts as a guide for cutting, folding, and gluing. It removes guesswork and ensures the packaging is produced exactly as designed.
This helps avoid costly printing errors such as misaligned text, missing folds, or incorrect cuts. Printers rely on dielines to deliver accurate results every time.
Save Time and Cost
Clear dielines reduce confusion during the printing and cutting process. When everything is mapped out, production runs more smoothly.
By preventing mistakes, dielines help save on wasted materials and extra revisions. This lowers costs and speeds up turnaround time.
Make Packaging Look Professional
A precise dieline ensures sharp edges, neat folds, and well-aligned artwork. This gives the final package a clean, polished look.
Professional packaging builds trust with customers and makes the product feel high quality.
Create a Better Unboxing Experience
Well-planned dielines make packaging easier to open and use. Customers can enjoy the product without struggling to tear or cut the box.
This small detail improves the overall unboxing experience, which can leave a lasting impression.
Keep Branding Consistent
Dielines guide where logos, text, and graphics are placed. This keeps every package aligned with brand standards.
Consistency across packaging helps strengthen your brand identity and makes your product instantly recognizable.
Tips for Dielines
Double-Check Folds and Cuts
Review every fold, cut, and perforation on your dieline before sending it to print. Small mistakes at this stage can lead to major issues in production.
A careful check ensures the packaging will assemble correctly and function as intended.
Use Correct Colors for Lines
Different line types should always be marked with unique colors. For example, red for cut lines and blue for fold lines.
This helps printers clearly understand each instruction and prevents confusion during production.
Keep Important Design Inside Safe Zones
Logos, text, and key graphics should stay within the safe zone. Anything placed outside this area risks being trimmed off.
Staying inside the safe zone ensures your branding and message remain clear on the final product.
Test with a Sample or 3D Mockup
Before mass production, print a sample or create a 3D mockup. This helps you see how the dieline works in real life.
Testing can reveal alignment issues or design problems that may not show up on screen.
Share Dieline with Your Printer Early
Always provide the dieline to your printer before finalizing the design. Printers can review it and suggest adjustments if needed.
Early collaboration helps avoid costly errors and ensures a smoother printing process.
Conclusion
Dielines are the blueprint for packaging. They help place designs in the right spot and avoid costly errors. A correct dieline makes your packaging professional, efficient, and ready for production.
At HT Custom Boxes, we design dielines and packaging solutions for every need. From eco-friendly boxes to premium finishes, we can help bring your product to life.
Frequently Asked Questions
What is the difference between die cut and die line?
A die line is a template that shows where to cut, fold, or crease a printed material. A die cut is the actual process of cutting the material into a specific shape using that template.
What is a dieline used for?
A dieline is used as a guide in printing and packaging to show where the design will be cut, folded, or perforated.
How many types of lines in the dieline?
3 types of lines in a dieline include:
- Solid lines for cutting
- Dashed lines for folding
- Dotted lines for perforation
Use of die line in printing
In printing, a die line acts as a blueprint to ensure the final product is cut and folded exactly as intended.
Does the dieline print?
No, it is only a guide and does not print.
What file should I send to a printer?
Send AI, EPS, or PDF files with the dieline on a non-printing layer.
Can dielines include embossing or foiling?
Yes, mark special finishes with separate colors.
Who uses dielines?
They are used across food, cosmetics, electronics, and retail packaging.


.webp)


